Here is another great blog on using Adobe Illustrator to make colour charts, this time in the form of a video. Enjoy!
This example is not done to any realistic scale (six shoulder stitches would be a seriously chunky yarn!), so you may wish to make your initial template a little closer to a realistic gauge. Once you copy your template into a working spreadsheet for an individual design, you can easily add rows and columns and edit the aspect ratio of the cells so that your schematic will be to scale from your swatch.
Look carefully at existing schematic drawings in published patterns for help with representing your design in a flat pattern visual. There are also many books available - one of my favourite resources is Deborah Newton's Designing Knitwear.
I hope this series has been helpful and provided you with some ideas for using Excel in creative ways!
Computers and spreadsheets are great, but sometimes plain old paper and pencil are the best design tools going. I used to keep swatches in a binder along with yarn notes etc, but the swatches add a lot of bulk, so I had a brainstorm one day – make a colour photocopy of the swatch to put in the binder. Not only does it cut down on the bulk in the binder, but printer/scanner/copiers make pretty much actual size photocopies of things, so measuring gauge right on the paper instead of a 3D stretchy swatch is a great way to get an accurate measure. AND, I can use this colour (or black and white) copy of a swatch and design right on it. I’m not going to say right now what the design is that I have in process, but keen eyes might be able to guess the inspiration.
Namaste!


at I just had to share.Now I'm ready to copy and paste the symbols from the legend in to my 21 stitch x 20 row "digital swatch". I've chosen "Old Shale", a pretty traditional lace pattern that is probably familiar to most readers. I'm using Mary Thomas's Book of Knitting Patterns. The first thing the pattern tells me is that I need a number of stitches cast on that is divisible by 11, so I will need to insert a column so that I have 22 stitches to work with. Here is what the finished chart looks like.
Once you have charted the first four rows, you can copy and paste them as a whole (ie select the entire area of 22 stitches by 4 rows) the rest of the way up the chart.
Be sure to read all the previous entries in this series for more detailed instructions on some of the more basic operations in Excel.
So far we've only graphed "digital swatches", but the next and final lesson will be setting up garment shaped templates for use (and re-use) so that you can chart texture or colour patterns over the entire garment. This is very useful in design so that you can ensure that patterns are centred properly and work well in relation to one another.
As always, comments welcome.
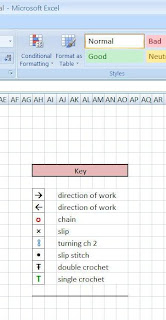
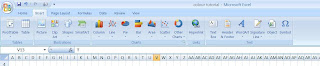
For the heading, I merged eight cells together, shaded the resulting cell, and drew a border around it. I then inserted the symbols that I wanted using the "Symbol" menu icon seen below on the far right.
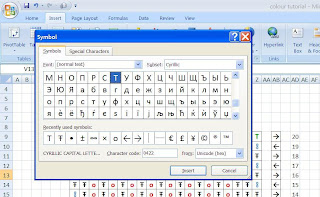
You can see from the screen shot above that my "recently used symbols" include the items in my Key. Explore and see what you can find among the fonts on your computer, and when you find symbols that you like, click on them and then click "insert" (make sure that you have selected the cell on your worksheet where you want the symbol to be first).
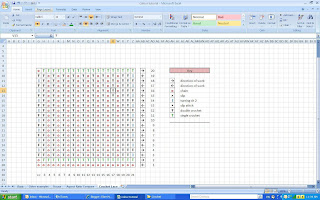
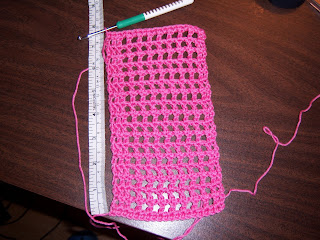
Once I have completed my "key" I draw a border around each symbol. I also change the colour of each symbol so that they show up on the chart a little better, but that is a personal preference. To do this, you use the text colour function, not the paint function (paint changes the cell background colour, not the contents). Once I have all of this set, it is then simply a matter of copying and pasting each symbol where I want it in the chart. Below is an example of a chart for a small swatch done in a mesh or filet crochet pattern.

I hope that this has been helpful. Please feel free to post comments! Next time: charting crochet stitches.


Stay tuned.........

These were made with Briggs and Little Heritage yarn (I think) and B&L pencil roving for the thrums. They make great, super warm slippers, and they stand up reasonably well, although I have a pair right now (not pictured) that will require some heel surgery.

So I started out quietly, getting myself back into the swing of things by doing this swatch, experimenting with spacing - close/not close, lined up/offset, tone on tone (hard to tell in the picture, perhaps, but there is a section near the top of brown thrums on brown yarn), and then the fun started! You'll get an idea from the top little cluster of thrums of the variety of awesome colours I have in the fleece. I know it's curled there, and hard to see (although you get a glimpse of the fleecey goodness at the back where it curls).
I never thought I'd hear myself say this, as someone who used to hate to swatch, but I'm sold on it now - sometimes it's just darn fun to play around.
To be continued.......
keep clean, and second, this endless winter of snow, ice and bitter cold has left me starved for colour (see my previous post about the grey socks). This project's saving grace is that this is pretty much the softest yarn I have had the pleasure to run through my fingers in a long time. It's Diamond Luxury Collection Fine Merino Superwash Aran, and it's heavenly to knit with. Creamy is an adjective that pops into my mind.
The pattern is a Cynthia Helene design found in Shepherd pattern leaflet #1912 "Outdoor Pursuits". I have no links I'm afraid, because I think the leaflet is out of print and I actually just googled Cynthia Helene and she doesn't appear to have a website.