I’m sitting in my office absolutely useless as the humidex reaches 36 C – no air conditioning, just a sorry little fan that is moving the hot air around. Luckily I’m self employed, so when it’s way too hot to work, I am quite free to just surf the web and obsess over the Canadian Hurricane Website and the latest proposed track of Hurricane Earl. We’ve actually spent the last day or so making sure that we have everything we will need (based on our previous experience of Hurricane Juan) to “weather the storm”. Hope for the best, prepare for the worst.
Tuesday, August 31, 2010
Heat Waves and Hurricanes
Monday, August 23, 2010
Wednesday, July 28, 2010
And now for something completely different!
It was a really great exercise that got me thinking about why exactly I’m “drawn” to art journaling (pun sort of intended!). I kept a diary for awhile when I was growing up, and I’m definitely a list-writer and record keeper, and I also have a fascination with blank journals – everything from dollar store journals to wonderful handmade ones to Moleskine journals. When I was a kid I used to love to cut pictures out of old magazines and catalogues and play with them like paper dolls, and I used to like to try to draw but never felt that what I got on the paper did justice to the image that was in my head, so I guess I let my inner critic win for awhile.
So I think art journaling sort of brings all of that together and is a great place to play!
Friday, May 07, 2010
Hands of Time

This is my grandmother and grandfather Mary and Alden Hartling, taken around the time of their marriage in 1923 - my grandfather was 30 years old and my grandmother was 19. I could not begin to guess how many quilts she made in her life, many of which were made and sold, but I have three. I have many fond memories of sitting beside her in the evenings while she cut out quilt pieces using templates she drew on cereal box cardboard. She died in 1980, when I was 15 years old.

The picture on the right is of my great grandmother and great grandfather, Libby and Donald "Big William" Cameron, taken after the birth of my grandfather, William Hugh Cameron (the baby in the picture) in 1896. Libby outlived three husbands and one daughter, and died in 1945. I inherited an unfinished embroidered table cloth that she was working on at the time of her death, which is included in the exhibition. My grandfather in the picture, Bill, died three months before I was born, on December 24, 1964. My great grandfather, Donald "Big William", was a carriage and furniture maker, and made the spool bed, chairs, and spinning wheel in the exhibit.
If you are in the area between May 8 and June 12, please drop by the gallery, and drop back to this blog for pictures from the exhibit.
Sunday, August 23, 2009
Hurricane Bill
Combine the awesome wonder of nature and power of a hurricane with the awesome wonder and power of the internet and instant satellite pictures, and as long as my roof stays on, it is actually very cool to watch the outer bands of this hurricane approach us on satellite and then step outside and watch exactly the same thing. We just had a huge downpour that lasted maybe five minutes, and when I go out I can still see blue sky peeking through some of the wispy lower clouds and it’s not raining a drop, and the humidity is incredibly high (well, 100%). You can just picture it as a wispy outer arm that must have passed over us, all spiralling in exactly the direction that it should be.
That’s all – just a moment of weather awe and geekiness.
Tuesday, July 14, 2009
Retro moth fashion?
Sunday, July 05, 2009
Travel Fun

Oh, and of course I bought a little bit of yarn too!

I'm not sure what I'll make yet - maybe mittens with the Plymouth and socks with the Jitterbug. I’ll check out Ravelry and see what cool things other people are making with these yarns. That is one of my favourite features of the Ravelry site.
Later!
Monday, June 01, 2009
DI(y) Shopping Bag


Thursday, May 21, 2009
Blog surfing again
Here is another great blog on using Adobe Illustrator to make colour charts, this time in the form of a video. Enjoy!
Monday, May 18, 2009
Part 5: Making templates with basic garment shapes
Making a template spreadsheet of basic shapes that you will use over and over again will save you a lot of time in the initial set up. My suggestion would be to open a blank spreadsheet, and, one per worksheet, outline (with the line drawing tool) some basic flat shapes - sweater, sock, mitten, etc. Whatever will be of most use to you. Or collect these basic shapes as you develop your own library by copying and pasting into a specially designated "Template" spreadsheet for easy access.
Here is a basic sweater front and back shape.
This example is not done to any realistic scale (six shoulder stitches would be a seriously chunky yarn!), so you may wish to make your initial template a little closer to a realistic gauge. Once you copy your template into a working spreadsheet for an individual design, you can easily add rows and columns and edit the aspect ratio of the cells so that your schematic will be to scale from your swatch.
Look carefully at existing schematic drawings in published patterns for help with representing your design in a flat pattern visual. There are also many books available - one of my favourite resources is Deborah Newton's Designing Knitwear.
I hope this series has been helpful and provided you with some ideas for using Excel in creative ways!
Tuesday, May 12, 2009
Workin' it
Computers and spreadsheets are great, but sometimes plain old paper and pencil are the best design tools going. I used to keep swatches in a binder along with yarn notes etc, but the swatches add a lot of bulk, so I had a brainstorm one day – make a colour photocopy of the swatch to put in the binder. Not only does it cut down on the bulk in the binder, but printer/scanner/copiers make pretty much actual size photocopies of things, so measuring gauge right on the paper instead of a 3D stretchy swatch is a great way to get an accurate measure. AND, I can use this colour (or black and white) copy of a swatch and design right on it. I’m not going to say right now what the design is that I have in process, but keen eyes might be able to guess the inspiration.
Namaste!
Sunday, May 10, 2009
Catch Up

Tuesday, April 14, 2009
Ready to Assemble

at I just had to share.That's it - back to taxes now.
Saturday, March 21, 2009
Part 4 - A Simple Knit Lace Chart
Some of the symbols that I use for charting knitting stitches can be seen in this screen shot, and can be found in the "Symbols" menu.
Now I'm ready to copy and paste the symbols from the legend in to my 21 stitch x 20 row "digital swatch". I've chosen "Old Shale", a pretty traditional lace pattern that is probably familiar to most readers. I'm using Mary Thomas's Book of Knitting Patterns. The first thing the pattern tells me is that I need a number of stitches cast on that is divisible by 11, so I will need to insert a column so that I have 22 stitches to work with. Here is what the finished chart looks like.
Once you have charted the first four rows, you can copy and paste them as a whole (ie select the entire area of 22 stitches by 4 rows) the rest of the way up the chart.
Be sure to read all the previous entries in this series for more detailed instructions on some of the more basic operations in Excel.
So far we've only graphed "digital swatches", but the next and final lesson will be setting up garment shaped templates for use (and re-use) so that you can chart texture or colour patterns over the entire garment. This is very useful in design so that you can ensure that patterns are centred properly and work well in relation to one another.
As always, comments welcome.
Wednesday, March 11, 2009
Plausible Posers
Check this out:
The world IS just awesome!
Sunday, March 08, 2009
Part 3 Simple Crochet Lace Chart
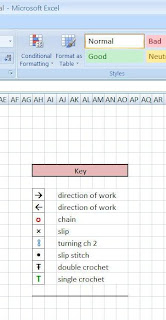
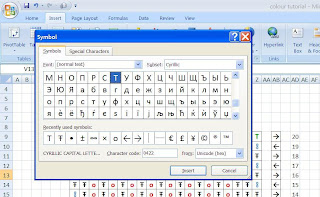
For the heading, I merged eight cells together, shaded the resulting cell, and drew a border around it. I then inserted the symbols that I wanted using the "Symbol" menu icon seen below on the far right.
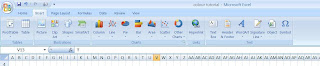
You can see from the screen shot above that my "recently used symbols" include the items in my Key. Explore and see what you can find among the fonts on your computer, and when you find symbols that you like, click on them and then click "insert" (make sure that you have selected the cell on your worksheet where you want the symbol to be first).
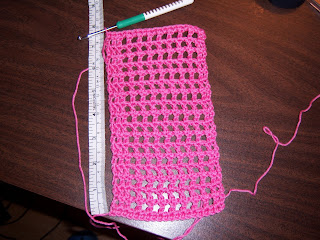
Once I have completed my "key" I draw a border around each symbol. I also change the colour of each symbol so that they show up on the chart a little better, but that is a personal preference. To do this, you use the text colour function, not the paint function (paint changes the cell background colour, not the contents). Once I have all of this set, it is then simply a matter of copying and pasting each symbol where I want it in the chart. Below is an example of a chart for a small swatch done in a mesh or filet crochet pattern.
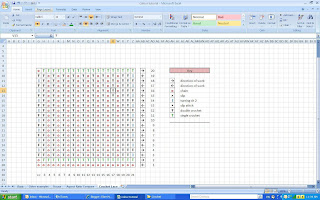
You can see that I've also added a stitch count across the bottom, and row numbering up the side, as well as "direction of work" arrows for further clarity.

The stitches and rows are exactly as charted, but as you can see I have a rectangle that actually measures 4.5 inches wide and 7.5 inches long, which would make an aspect ratio of 1.67. Therefore, if I wanted my chart to represent the true proportions, and my cell width is 26 pixels, then I would have to make the cell height 43 pixels (1.67 x 26).
As always, comments, feedback and/or questions welcome!
Sunday, March 01, 2009
Part 2 Addendum
Saturday, February 28, 2009
Charting with Excel - Part 2: Colour Charts
- Open a new Excel file
- You'll notice that the default size of each cell is a fairly wide rectangle. We want to change these cells to be much more square. In order to do that, hold your mouse over the square immediately to the left of column A and immediately above row 1 and click once. This will highlight the entire worksheet, and you do this when you want to make a universal change to the entire worksheet (such as formatting, font, or cell size). Your worksheet should now look something like this:
- Now hold your mouse on the vertical line that separated the column heading A and the column heading B. You cursor should change from a cross shape, to a black vertical line bissected with a black horizontal line with arrows at either end. Click and hold the left mouse button and drag the cursor to the left until the number of pixels reads 24. Release the mouse button and your spreadsheet should look like this.
- The next thing I like to do is block out the area (stitches and rows) that I want to chart. If we think of this sample as a small "swatch", then let's draw a square or border around an area 20 stitches (or cells) wide and 20 rows tall. To do this, "select" cells by clicking once on cell F6. Notice that there is a bold line around this cell. This isn't permanent, it is just an indicator of what cell you have selected. Hold down your left mouse button and move your mouse horizontally across the spreadsheet until you have 20 cells highlighted, and then continuing to hold the left mouse button down, move the mouse vertically so that you can select 20 rows down as well. You can tell the number of rows and columns you have selected by looking in the area just above the column headers - 20 R x 20 C.
- When you release the button, your spreadsheet should look like this.
- Now we need to draw a permanent border around this square. In the menu area, just to the left of the paint can, is an image of a small block of four squares with a line drawn across the two bottom squares.
- Click on the tiny triangle just to the right of that to bring down a drop down menu of types of borders, and choose the "thick box border" (eighth one down).
- Your spreadsheet should now look like this.
- Now we want to incorporate a simple colour pattern by colouring the squares. To do this, select cell I23, and then click on the small triangle to the right of the paint can (see earlier screen shot) to bring up a pallet of available colours. If this selection isn't enough colours to choose from, have some fun clicking on "more colours" and have a look at both the standard and custom tabs!
- For our tutorial, let's just click on basic red. This is what you should now have.
- Now you can chart a simple design by either (a) copying and pasting this square to other squares, or (b) selecting other squares and clicking once on the paint box (which will show red). You can make any design you wish, or try your hand at the following design.
- You are of course not limited to one colour, nor do you need to be limited to a 20 x 20 space. Feel free to experiment. Perhaps try your hand at charting out a picture, or a fairisle design. Most importantly, though, have some fun and play a little!
I hope that this has been helpful. Please feel free to post comments! Next time: charting crochet stitches.
Charting Patterns with Excel - Part 1
I use Microsoft Excel Version 2007. Most of the functions that I will describe are available on earlier versions of Excel, but the menu paths may differ somewhat. The "Help" menu for Excel is excellent, and should help you to find the functions I describe for earlier versions of Excel.
There are a few limitations with the program. One is that, as far as I'm aware (and please correct me if I'm wrong!), Excel will not do a polar graph (circular, not to be confused with a pie chart, which Excel does do), so charting such things as doilies or table cloths, knit or crocheted in the round, is not possible. However, if you google "polar graph paper" there are sites that provide free templates that you can print off and use the old fashioned way.
The other limitation is with the fonts. There are standard knit and crochet symbols found in published patterns, and you can download free (for personal use only) knitting symbols fonts from The Knitting Universe. As far as a font for crochet symbols goes, there must be something out there but I could only find one (please update me if anyone knows of any!). My solution for the time being is to improvise with the many symbols that are available, and just define them carefully in a "key" or "legend".
Finally, a word about reading charts. Charts, particularly those for knitting and crochet patterns, are generally (unless otherwise indicated) read from the bottom right, the first row being read right to left, the second row left to right, and alternating in that manner to the top of the chart. I put directional arrows on most of my charts so that it is clear.
I have a rough outline for this Excel tutorial series as follows:
- Part 2: a step by step tutorial (with lots of screen shots for clarity) on making a simple colour chart.
- Part 3: a simple crochet lace chart.
- Part 4: a simple knit lace chart.
- Part 5: making "reusable" templates with basic garment shapes.